13.3 Obtaining an authorization code
The first thing you must do when calling the API is to obtain an authorization code. To do this, you submit information to the /connect/authorize endpoint of the web.oauth2 web service, which then allows you to use whatever authentication methods you have configured to identify yourself to the MyID authentication server; the authentication server then returns the authorization code.
See section 4.2.2, Requesting an authorization code for an overview of this process.
The following example uses a visible HTML form so that you can see what is going on.
Create a new HTML document called index.html.
Add the following:
<html>
<head>
<title>Single-page PKCE client authentication through Javascript</title>
</head>
<body>
<div id="intro">
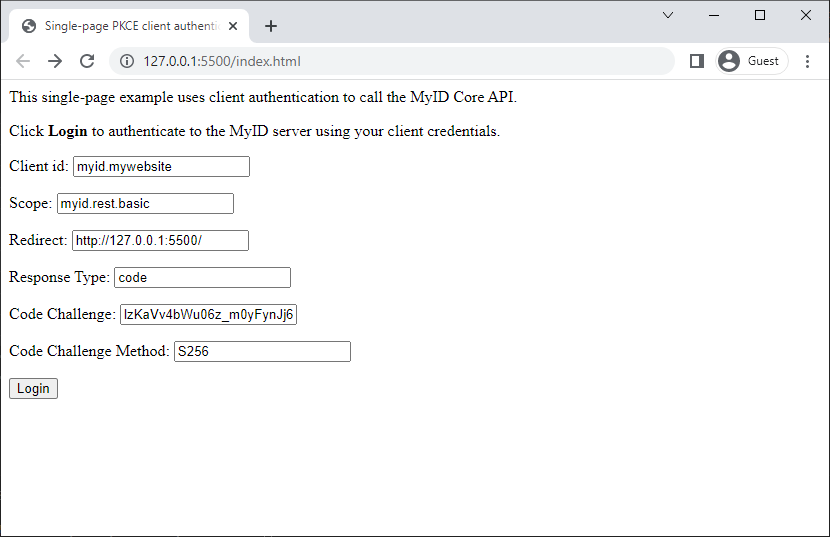
<p>This single-page example uses client authentication to obtain an authorization code.</p>
</div>
</body>
</html>After the intro div, add a div for the form:
<div id="login">
    <p>Click <b>Login</b> to authenticate to the MyID server using
    your client credentials.</p>
    <form
        method="post"
        enctype="application/x-www-form-urlencoded"
        action="https://myserver/web.oauth2/connect/authorize">
        <p>Client id: <input type="text" name="client_id" value="myid.mywebsite"></p>
        <p>Scope: <input type="text" name="scope" value="myid.rest.basic"></p>
        <p>Redirect: <input type="text" name="redirect_uri" value="http://127.0.0.1:5500/"></p>
        <p>Response Type: <input type="text" name="response_type" value="code"></p>
        <p>Code Challenge: <input type="text" name="code_challenge" value="lzKaVv4bWu06z_m0yFynJj6zttnU5gYpXah8tLYKzGg"></p>
        <p>Code Challenge Method: <input type="text" name="code_challenge_method" value="S256"></p>
        <input type="submit" value="Login">
      </form>
</div>
The form contains the following elements:
-
action – the URL of the /connect/authorize endpoint on your MyID server; for example:
https://myserver/web.oauth2/connect/authorize
Important: Change myserver to the address of your own MyID server.
-
client_id – the client ID you set up in the web.oauth2 custom client configuration file.
In this example, this is:
myid.mywebsite
See section 13.2.1, Adding the API client for details.
-
scope – the scope that you are requesting that the user gets. This must match the scope set up in the web.oauth2 custom client configuration file.
In this example, this is:
myid.rest.basic
-
redirect_uri – the page to which you want the authentication server to return the authorization code. This is a single-page website, so the URL is the same as the current page; in this case, using the Live Server extension:
http://127.0.0.1:5500/
-
response_type – the type of authorization response returned. In this worked example, we use authorization codes (instead of, for example, tokens), so you must set this to:
code
-
code_challenge – the PKCE code challenge. In this case, we are using a static code challenge for simplicity; in a later example, we will generate a random code verifier and derive a code challenge from it.
-
code_challenge_method – set this to S256, indicating that we are using a SHA-256 hash.
After the login div, add a script that checks for a returned authorization code, and replaces the form with a display of the code if it is available:
<script>
    // Get the authorization code from the URL parameters.
    const queryString = window.location.search;
    const urlParams = new URLSearchParams(queryString);
    const code = urlParams.get('code');

    // If the code is available, display it instead of the login form
    if (code) {
        document.getElementById("login").innerHTML="<p>The authorization code is: " + code;
    }
</script>
You can now open this HTML page on your local web server.
Using Visual Studio Code and the Live Server extension, right-click on the HTML file in the Explorer pane, then from the pop-up menu select Open with Live Server.
Click Login, and you are taken to the MyID Authentication web page.
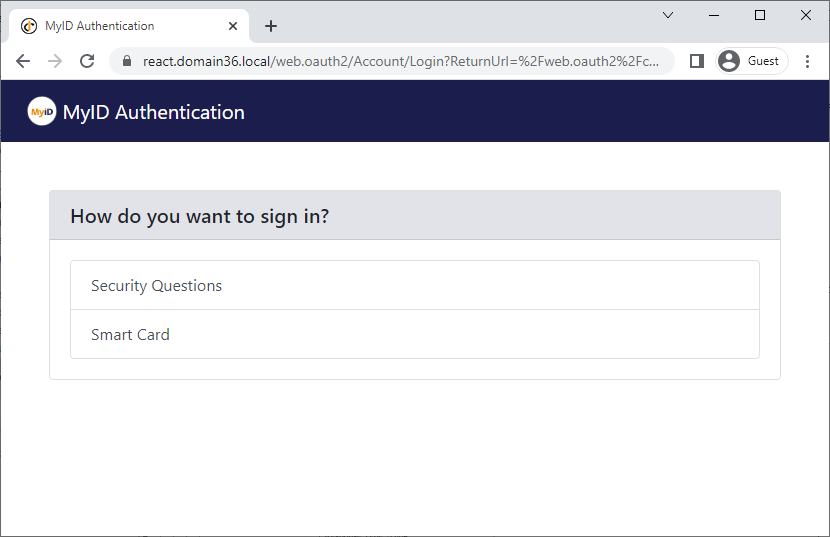
You can sign in with any configured authentication methods; in the above example, the MyID server is set up for security questions or smart cards, but you may have configured your system for external identity providers, authentication codes, FIDO, Windows Hello, integrated Windows logon; any method you have configured for MyID is available.
Once you have authenticated, you are returned to the page specified in the redirect_uri parameter from the form. The web page obtains the authorization code from the URL and displays it on screen:

Obtaining an authorization code is the first step to calling the API. But before we progress further, we should make the request form a bit easier to work with.